Preset Submission Guide

Preset Submission Guide
This is a guide that will help you make sure your preset submission goes as "seamless" as possible!
In this guide you will learn:
-
How to submit your preset
-
How to optimize your preset
-
Cleaning up compiler errors
-
Proper image usage
Going forward, I, Cord, who is the main handler of preset submissions, plan to be stricter with the submission process. I have been very lenient with acceptance and fixing the issues myself but I have written this guide in hopes that I can teach users how to avoid these issues even before they reach me.
Optimization
Optimization is the simple task of making your preset perform better for the majority. There are a few very simple ways to go about this that I will explain below.
We're going to start with keeping elements in your material that do not exist in your preset. A great example of this is the wings material section
Removing Unused Parts

This character does NOT have wings in game. Therefore there is no need to have this section within my material file. You can simply remove sections that are non applicable to your preset. For example, if you don't have a mane- remove the ManeMat. If you don't have tufts, remove the TuftMat/Tuft2Mat.
Not only does a smaller material file contribute all around to the size of the game, this is just small way to help keep it clean and perform better overall.
Another note I want to add is that as of August 2026 you CANNOT have more } than the material calls for. Your material sections should end with 4 } symbols. So that screenshot I posted above? It would not work!
Shrinking Images
Another way of optimizing your preset is to shrink images that do not need to be large. While our standard is 512x512, presets parts without much detail can afford to be 256x256 even. An example of this would be Mane textures that are just 2 or 3 colors, eyelids, or even a tail with just a colored tailtip.
In the example below, this is the teeth texture of a preset. It is all a single color. At 512x512, which is the size all of your images should be by default, a single color has only has one type of data to transfer- that one color. There is NO difference between having this single colored texture at 512x512, or having it as 1x1. It will perform exactly the same.
So please, if you have a single colored image, SHRINK IT TO 1x1. The only exceptions to this rule is if the image has a fur texture layered over it, in which it should remain 512x512, or 256x256 if it lacks much detail.
Another thing I have noticed after reviewing presets is the submission of transparent textures. THIS IS NOT NECCESARY. Simply remove the material section if you do not wish to use the part.

Use these inputs if you want plain black or white for your body parts
black.png
white.jpg
Use this input if you have plain white teeth
teethTex.jpg
As a general ruling we can take away from this, IF your image has data that is more than a single color please follow these sizes.
Mane textures should be 256x256.
Tuft textures should be 256x256.
Eye textures should be 256x56 UNLESS exceptionally detailed.
Body textures should remain 512x512.
Head Textures should remain 512x512.
Teeth textures should be 256x256.
Tail Textures should be 256x256 UNLESS exceptionally detailed.
Wing textures should be 256x256 UNLESS exceptionally detailed.
There is a single exception to the rule and this is detailed overlaying mask images. If you have an image that is mostly transparent and has a refined marking or emblem meant to glow on your character, discuss it with me personally. You may be permitted to allow this image to remain 1024x1024 to preserve the details, as they would likely be too blurry otherwise.
General Rules
Compiler Errors
I have been quietly cleaning compiler errors in material files ever since Lamina went through the painstaking effort to clear up every single compiler error on CO. Cleaning these errors is yet another method of maintaining that stable performance you've come to know and love about CO. In an effort to self govern fixing these issues, I am going to teach you how to fix this yourself.
Compiler errors can come in all different forms, but they are pretty straight forward when it comes to figuring out what they mean. But how do you find these errors? Simple! Locate the Game_Logfile.log in your main game folder as shown below.

You must load the game FIRST before you open this file. Once you have loaded the game and populated the file, errors that are present will appear. Lets study this one.

So we found a compiler error! This is the games simple way of communicating with you that it is confused and does not know how to process what you are telling it to do. The best part of this is that it tells you exactly which line the error appears on. It appears on line 139.
I recommend having Notepad++ installed on your computer to handle simple text documents like .txt or .material files. You will find that it is easier to navigate your lines with its visibility. If not, you can find the lines in regular notepad as well at the bottom. Every time you click on a new line, it changes and tells you where you are.

Lets go investigate that error! I am using Notepad++ for this example. I am going to navigate to line 139 and see what's got it so upset.

This version of Ogre that CO uses does not understand what this means. The best way to see if what the error is actually means something to your preset is to simply remove it. If removing it yielded no negative effects, good for you! You fixed it! If the issue was fixed, open up the game and let it load and then close it again. When you search for "compiler", you should see this:
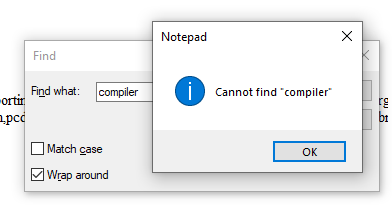
All clean!
Each error that you come across will be unique to your situation. It can be as simple as fixing a typo, or removing an added extra letter where it doesn't belong. There are a few instances where a numbered line may not appear to tell you exactly where the issue is, but in most cases you should be able to deduce what the error is asking of you. If you cannot, you may ask for help in our preset help channel and someone will assist you.
Submitting Your Preset
Preset submissions are periodically opened between updates. Users can submit their images and materials via Ticket System in the discord server. Presets that are not submitted can NOT be seen by other users in game. You will appear as a pure white character to others. Please follow these tips when submitting a preset to us.
Correctly Named Files
Naming your preset files correctly is INCREDIBLY IMPORTANT. All files in regards to a submission should be relative to the character you are submitting it for.
An example of an unacceptable file naming would be submitting an image named water.png. This is far too vague for us to associate this with your character and could easily be overwritten. The proper way to name this file would be Character_Usernamewater.png, or even Character_UsernameW.png
In the same breath I can mention that there is no need to elongate your file names and confuse yourself. Whether you write "Water" or just "W" will do the same exact thing so long as the files are named accordingly.
Zipping Files
When submitting a preset, you MUST zip your files. ALL of them. PLEASE do not send each file individually and please keep the material with the images. Your preset will not be accepted if the file is zipped incorrectly.
From Google:
To zip files on Windows, select the files or folders you want to compress. Right-click the selected items, choose Compress to ZIP file (Windows 11) or select Send to > Compressed (zipped) folder (Windows 10), and press Enter to name the file.
To zip files on a Mac, select the files or folders you want to compress in Finder. Right-click (or hold the Control key and click/tap with two fingers) on the selected items, then choose Compress from the shortcut menu. Your Mac will create a .zip file in the same folder
You can also use programs like WinRar or 7zip for oldschool folks like me.
Be Prompt
If something is missing, we need you to be prompt about providing fixes. If a file is missing, we cannot accept the preset without it unless you give us your permission to move forward without the missing parts. Double checking your work to make sure you have all the files goes a long way!
That's all!
If you made it to the end and you have followed all of these steps, your preset should be accepted! Good job and thank you for reading!